

Buy any Easy Native Extensions 2nd Edition package and get our $99 iOS + Android ANE Template completely free before the end of June 2015.
- step-by-step guide to making your iOS extension in under an hour
- library for data conversion between ActionScript and native code
- tutorials
- infographics
- code included
At the end of this tutorial you will have
An iOS library which connects with the camera, sets it up and starts it.
Time
15-20 minutes
Wait, have you done these first?
- Part 1: Create a test app – 15-20 minutes
- Part 2: Set up the Xcode project – 8-10 minutes
- Part 3: Set up the AIR Library – 8-10 minutes
If you are here just to see how to use AVFoundation to connect with the camera on iOS, that’s OK too – you can whizz through this part of the tutorial and ignore the prerequisites. (That’s what I’d do.)
Step 1: Find out how to capture frames from the camera
Your objective is to capture frames from the iPhone or iPad cameras and send them off to ActionScript to be displayed in a client app. Some digging in Apple’s developer library reveals that one way to do that is to implement the AVCaptureVideoDataOutputSampleBufferDelegate protocol:
AVCaptureVideoDataOutput object to receive captured video sample buffers and be notified of video frames that were dropped.You will also need an instance of AVCaptureSession, in order to connect to the camera and control it.
Step 2: Implement AVCaptureVideoDataOutputSampleBufferDelegate
Fair enough, let’s do that.
Add a new class to your Xcode project: File > New > File… In the dialog that appears under iOS select Cocoa Touch and on the left select Objective-C class:
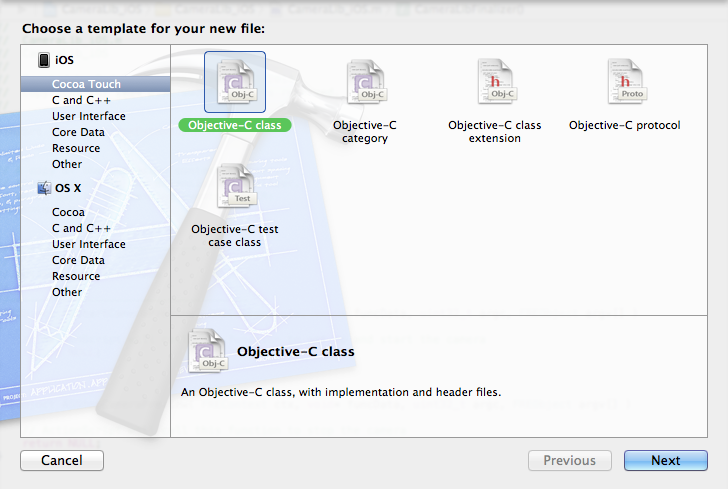
In the next step name your class CameraDelegate and make it a subclass of NSObject, then save it.
Xcode creates CameraDelegate.h and CameraDelegate.m for you:
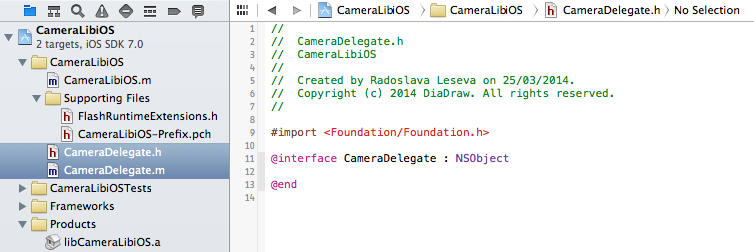 Let’s make CameraDelegate an implementor of the protocol that will let you capture video frames. Open CameraDelegate.h and modify it like this:
|
1 2 3 4 5 6 |
#import <Foundation/Foundation.h> #import <AVFoundation/AVCaptureOutput.h> // Allows us to use AVCaptureVideoDataOutputSampleBufferDelegate @interface CameraDelegate : NSObject <AVCaptureVideoDataOutputSampleBufferDelegate> @end |
Step 3: Add a capture session
You will use the capture session to set up, start and stop the camera, so you’ll need an instance of it to be around most of the time. Let’s make that a private member of the CameraDelegate class. Open CameraDelegate.m and modify it as follows:
|
1 2 3 4 5 6 7 8 9 10 11 12 13 |
#import <AVFoundation/AVCaptureSession.h> #import "CameraDelegate.h" @interface CameraDelegate() { @private AVCaptureSession * m_captureSession; // Lets us set up and control the camera } @end @implementation CameraDelegate @end |
Step 4: Choose a camera
Most of the new iOS devices have two cameras: front and back camera. Add a private Boolean method that lets you choose one of the cameras and returns true on success or false, if the camera you requested was not found.
In CameraDelegate.m add this to your imports:
|
1 |
#import <AVFoundation/AVCaptureDevice.h> // For access to the camera |
Next, add a private member (inside the @private section you declared above) that will keep a pointer to the camera:
|
1 |
AVCaptureDevice * m_camera; // A pointer to the front or to the back camera |
Then add the following private method between @implementation CameraDelegate and @end:
|
1 2 3 4 5 6 7 8 9 10 11 12 13 14 15 16 17 18 19 20 21 22 23 24 25 26 27 28 29 30 31 32 33 34 35 36 37 38 39 40 41 42 43 |
- ( BOOL ) findCamera: ( BOOL ) useFrontCamera { // 0. Make sure we initialize our camera pointer: m_camera = NULL; // 1. Get a list of available devices: // specifying AVMediaTypeVideo will ensure we only get a list of cameras, no microphones NSArray * devices = [ AVCaptureDevice devicesWithMediaType: AVMediaTypeVideo ]; // 2. Iterate through the device array and if a device is a camera, check if it's the one we want: for ( AVCaptureDevice * device in devices ) { if ( useFrontCamera && AVCaptureDevicePositionFront == [ device position ] ) { // We asked for the front camera and got the front camera, now keep a pointer to it: m_camera = device; } else if ( !useFrontCamera && AVCaptureDevicePositionBack == [ device position ] ) { // We asked for the back camera and here it is: m_camera = device; } } // 3. Set a frame rate for the camera: if ( NULL != m_camera ) { // We firt need to lock the camera, so noone else can mess with its configuration: if ( [ m_camera lockForConfiguration: NULL ] ) { // Set a minimum frame rate of 10 frames per second [ m_camera setActiveVideoMinFrameDuration: CMTimeMake( 1, 10 ) ]; // and a maximum of 30 frames per second [ m_camera setActiveVideoMaxFrameDuration: CMTimeMake( 1, 30 ) ]; [ m_camera unlockForConfiguration ]; } } // 4. If we've found the camera we want, return true return ( NULL != m_camera ); } |
Step 5: Attach the camera to the capture session
To attach the camera to the capture session, you’ll need an instance of AVCaptureDeviceInput – add one as a private member.
In CameraDelegate.m add this to your imports:
|
1 |
#import <AVFoundation/AVCaptureInput.h> // For adding a data input to the camera |
Then add this to CameraDelegate‘s private members:
|
1 |
AVCaptureDeviceInput * m_cameraInput; // This is the data input for the camera that allows us to capture frames |
And add the private method that will get the input from the camera and attach it to the capture session:
|
1 2 3 4 5 6 7 8 9 10 11 12 13 14 15 16 17 18 19 20 21 22 23 24 25 26 27 28 29 30 31 32 33 34 |
- ( BOOL ) attachCameraToCaptureSession { // 0. Assume we've found the camera and set up the session first: assert( NULL != m_camera ); assert( NULL != m_captureSession ); // 1. Initialize the camera input m_cameraInput = NULL; // 2. Request a camera input from the camera NSError * error = NULL; m_cameraInput = [ AVCaptureDeviceInput deviceInputWithDevice: m_camera error: &error ]; // 2.1. Check if we've got any errors if ( NULL != error ) { // TODO: send an error event to ActionScript return false; } // 3. We've got the input from the camera, now attach it to the capture session: if ( [ m_captureSession canAddInput: m_cameraInput ] ) { [ m_captureSession addInput: m_cameraInput ]; } else { // TODO: send an error event to ActionScript return false; } // 4. Done, the attaching was successful, return true to signal that return true; } |
Step 6: Create output for capturing frames
In CameraDelegate.m add this to your imports:
|
1 2 |
#import <AVFoundation/AVCaptureOutput.h> // For capturing frames #import <CoreVideo/CVPixelBuffer.h> // for using pixel format types |
Then add this to CameraDelegate‘s private members:
|
1 |
AVCaptureVideoDataOutput * m_videoOutput; // For the video frame data from the camera |
And add another private method to set up the video data output and attach it to the capture session:
|
1 2 3 4 5 6 7 8 9 10 11 12 13 14 15 16 17 18 19 20 21 22 23 |
- ( void ) setupVideoOutput { // 1. Create the video data output m_videoOutput = [ [ AVCaptureVideoDataOutput alloc ] init ]; // 2. Create a queue for capturing video frames dispatch_queue_t captureQueue = dispatch_queue_create( "captureQueue", DISPATCH_QUEUE_SERIAL ); // 3. Use the AVCaptureVideoDataOutputSampleBufferDelegate capabilities of CameraDelegate: [ m_videoOutput setSampleBufferDelegate: self queue: captureQueue ]; // 4. Set up the video output // 4.1. Do we care about missing frames? m_videoOutput.alwaysDiscardsLateVideoFrames = NO; // 4.2. We want the frames in some RGB format, which is what ActionScript can deal with NSNumber * framePixelFormat = [ NSNumber numberWithInt: kCVPixelFormatType_32BGRA ]; m_videoOutput.videoSettings = [ NSDictionary dictionaryWithObject: framePixelFormat forKey: ( id ) kCVPixelBufferPixelFormatTypeKey ]; // 5. Add the video data output to the capture session [ m_captureSession addOutput: m_videoOutput ]; } |
Step 7: Add a callback for capturing video frames
This is a method of AVCaptureVideoDataOutputSampleBufferDelegate which you need to implement. It will be called, usually on a separate thread, every time a video frame has been captured, giving you the opportunity to display it in the client app. The callback has a specific signature – add the following as a private method:
|
1 2 3 4 5 6 7 8 9 10 11 |
- ( void ) captureOutput: ( AVCaptureOutput * ) captureOutput didOutputSampleBuffer: ( CMSampleBufferRef ) sampleBuffer fromConnection: ( AVCaptureConnection * ) connection { // 1. Check if this is the output we are expecting: if ( captureOutput == m_videoOutput ) { // 2. If it's a video frame, copy it from the sample buffer: [ self copyVideoFrame: sampleBuffer ]; } } |
Step 8: Add a placeholder for copying video frames
How you manage the arriving video frames will be the subject of Part 6: Grab frames from iOS camera. For now add a placeholder for dealing with them. Add this private method:
|
1 2 3 4 |
- ( void ) copyVideoFrame: ( CMSampleBufferRef ) sampleBuffer { // TODO: To be implemented in the next part of this tutorial } |
Step 9: Add a ‘camera has started’ callback
When you set everything up and pull the trigger on the capture session to start the camera, you won’t yet know whether the camera has started successfully or not. This happens asynchronously, so to get notified, you’ll need to set up a callback that takes NSNotification. Add this as a private method to CameraDelegate:
|
1 2 3 4 5 6 7 8 9 10 |
- ( void ) videoCameraStarted: ( NSNotification * ) note { // This callback has done its job, now disconnect it [ [ NSNotificationCenter defaultCenter ] removeObserver: self name: AVCaptureSessionDidStartRunningNotification object: m_captureSession ]; // Now send an event to ActionScript sendMessage( @"CAMERA_STARTED_EVENT", @"" ); } |
Did you notice the sendMessage() call there? This calls the auxiliary function you added in Part 2 for sending events to ActionScript. How forward-thinking of you!
For CameraDelegate.m to see sendMessage() however, you need to declare it as an external function at the top of the file (right underneath all of your #import directives):
|
1 2 3 |
// See Keeping your C native code reusable and independent of AIR // at http://easynativeextensions.com/keeping-your-native-code-reusable/ extern void sendMessage( const NSString * const messageType, const NSString * const message ); |
Step 10: Initialize thy members
It’s pedantic. It’s important. It will save you hours of debugging, when you discover that the compiler is nice to you and initializes all of your pointers in the debug build, but is nice to you in a different way in release builds and doesn’t bother with initialization there.
Add an init() function to CameraDelegate and initialize all members you have added so far:
|
1 2 3 4 5 6 7 8 9 10 11 12 13 |
- ( id ) init { // 1. Initialize the parent class(es) up the hierarchy and create self: self = [ super init ]; // 2. Initialize members: m_captureSession = NULL; m_camera = NULL; m_cameraInput = NULL; m_videoOutput = NULL; return self; } |
Step 11: Start the camera already!
It’s time to put all of the ingredients together and add a method that will stat the camera. Phew!
This will be a public method, as we’ll want to call it from the ActionScript interface you added to CameraLibiOS.m in Part 2, so first declare it in CameraDelegate.h:
|
1 2 3 4 5 |
@interface CameraDelegate : NSObject <AVCaptureVideoDataOutputSampleBufferDelegate> - ( BOOL ) startCamera; @end |
Then add the definition to CameraDelegate.m:
|
1 2 3 4 5 6 7 8 9 10 11 12 13 14 15 16 17 18 19 20 21 22 23 24 25 26 27 28 29 30 31 32 33 34 35 36 37 38 39 40 41 42 43 44 45 46 47 48 |
- ( BOOL ) startCamera { // 1. Find the back camera if ( ![ self findCamera: false ] ) { return false; } //2. Make sure we have a capture session if ( NULL == m_captureSession ) { m_captureSession = [ [ AVCaptureSession alloc ] init ]; } // 3. Choose a preset for the session. // Optional TODO: You can parameterize this and set it in ActionScript. NSString * cameraResolutionPreset = AVCaptureSessionPreset640x480; // 4. Check if the preset is supported on the device by asking the capture session: if ( ![ m_captureSession canSetSessionPreset: cameraResolutionPreset ] ) { // Optional TODO: Send an error event to ActionScript return false; } // 4.1. The preset is OK, now set up the capture session to use it [ m_captureSession setSessionPreset: cameraResolutionPreset ]; // 5. Plug camera and capture sesiossion together [ self attachCameraToCaptureSession ]; // 6. Add the video output [ self setupVideoOutput ]; // 7. Set up a callback, so we are notified when the camera actually starts [ [ NSNotificationCenter defaultCenter ] addObserver: self selector: @selector( videoCameraStarted: ) name: AVCaptureSessionDidStartRunningNotification object: m_captureSession ]; // 8. 3, 2, 1, 0... Start! [ m_captureSession startRunning ]; // Note: Returning true from this function only means that setting up went OK. // It doesn't mean that the camera has started yet. // We get notified about the camera having started in the videoCameraStarted() callback. return true; } |
What’s next?
- If I were you, I would want to know if this pile of code actually works. That’s what you’ll do in Part 5: Start the camera from ActionScript (5-6 minutes).
- Here is the table of contents for the tutorial, in case you want to jump back or ahead.
Check out the DiaDraw Camera Driver ANE.
[…] And just for the record, this is not an entirely new concept. Easy Native Extensions has an iOS camera tutorial dedicated to funneling camera frames into Adobe AIR (ActionScript). […]