

Buy any Easy Native Extensions 2nd Edition package and get our $99 iOS + Android ANE Template completely free before the end of June 2015.
- step-by-step guide to making your iOS extension in under an hour
- library for data conversion between ActionScript and native code
- tutorials
- infographics
- code included
This tutorial shows you how to get an AIR app to appear in the iOS 8 Share Menu, using an iOS app extension. Something to keep in mind before we begin: an iOS app extension is different from an ANE.
At the end of this tutorial you will have:
An AIR app for iOS that is extended to show in the iOS 8 Share Menu.
Note: The focus of this tutorial is to see how an iOS app extension can be integrated in an AIR app, rather than how to code it. For that purpose we have picked the simplest possible scenario and you will notice it won’t require you to write a line of native code. If you need something more elaborate, leave a comment below.
Time
15-20 minutes![]()
- Step 1: Have an AIR app ready
- Step 2: Trick Xcode with a native app
- Step 3: Create an iOS app extension
- Step 4: Embed the iOS extension in your AIR app
- Step 5: Check out your app in the Share Menu
Step 1: Have an AIR app ready
Yeah, I know, you already have one. That’s why you are here.
For now just take a note of your app ID. Here is one I prepared earlier:
|
1 |
<id>com.diadraw.AIRApp</id> |
Step 2: Trick Xcode
Xcode won’t let you create an iOS extension by itself. It needs to know about the app it will be extending. The good news is that you don’t need to do anything complicated here: create an app project in Xcode, give it the same app ID as your AIR app and that’s it.
Start Xcode and select File > New > Project…
In the wizard make your new project an iOS > Application > Single View Application:

Here is the most important thing you need to do: make sure your Xcode app has the same ID (Bundle Identifier) as your AIR app:

Step 3: Create an iOS extension
Not an AIR one. They should call them plugins really…
With your newly created Xcode project open select File > New > Target…
Tell the wizard you want an iOS > Application Extension > Share Extension for the purposes of this tutorial. Notice how this Application Extension option was not available earlier, before we had an app in the project?

In the next step of the wizard name your iOS Extension. Under Embed in Application you should be able to select the fake app you created earlier:

For this iOS extension to work you don’t need to do anything else, just tell Xcode to build it: Product > Build. This should produce an .appex (Application Extension) file:
Step 4: Embed the iOS Extension in your AIR app
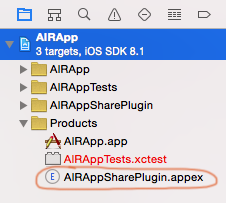
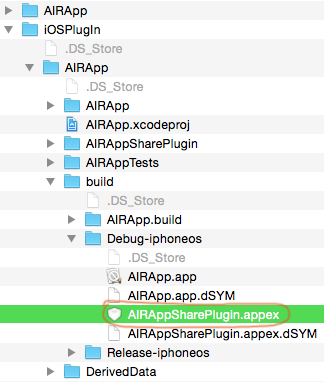
First, locate the .appex file on the disk (you can right-click the .appex file under Products in Xcode and select Show in Finder):
Next, locate the folder where your AIR app will be packaged. If you are using Flash Builder to package it for you, this would be the bin-debug folder of your Flash Builder project.
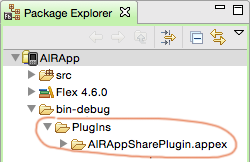
Crucial detail: in your app packaging folder create a new folder, name it PlugIns and copy the .appex file in it:
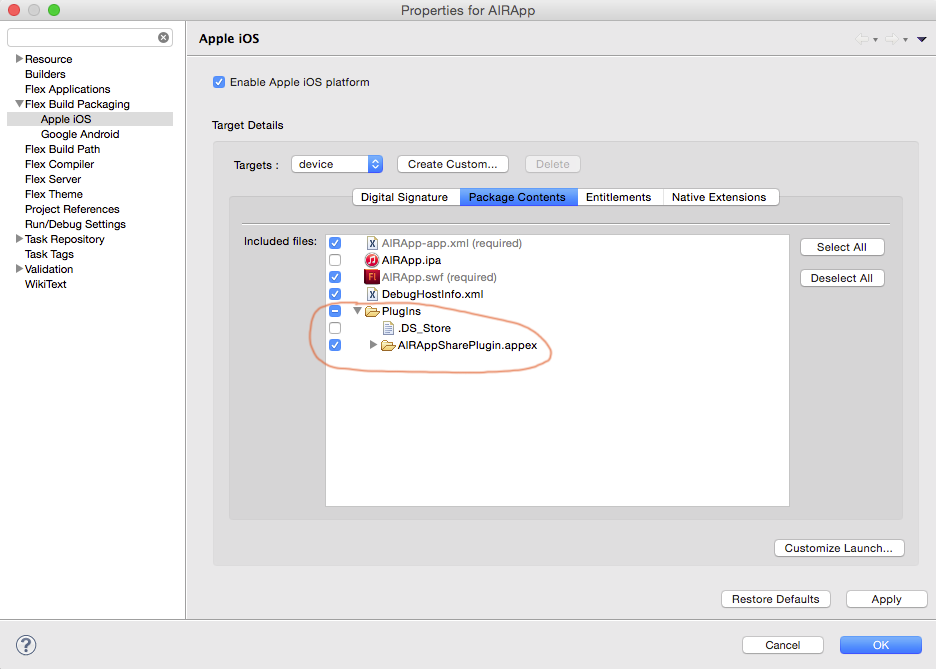
Last, make sure the PlugIns folder is included in the IPA package. If you are using a build script you may need to modify it (or leave a comment below if you want me to send you one). If however you are packaging from Flash Builder (or a similar IDE), set this in your app’s Project > Properties > Flex Build Packaging > Apple iOS > Package Contents:
To have a look inside, rename your .ipa to .zip, unzip it, open the Payload folder that appears, right-click the package that’s inside it and select Show Package Contents. This should show you what your app is made of:

Why did I decide the .appex file should go in there? I euthanised and dissected a native app with an extension I made in Xcode and checked how iOS extensions are packaged in it.
Step 5: Check out your app in the Share Menu
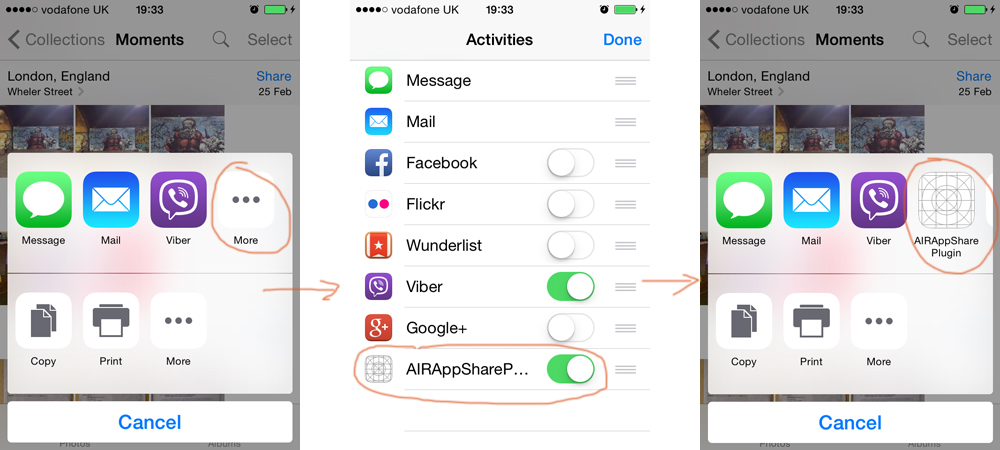
On your iOS device go to a file you may want to share, for example a photo. Show the Share menu and tap the More button. Your AIR app should now appear in the list of apps for sharing. Enable it and tap Done. Your AIR app should now appear in the Share menu:

First, thanks for the tutorial!
I can’t get it work though – after I added the .appex to the PlugIns folder the .ipa won’t install on my device anymore – error: “application verification failed”
Do I need to sign the .appex with a provision profile or something?
I never used Xcode before so I might be possible that I missed something ovious?
Hi Tom,
In my experiment I left the appex target set to “Don’t code sign”.
Could you try the following and see if you can get more details on your issue: with your iOS device plugged in open Window > Devices in Xcode. Select your device on the left. In the right pane you should see information about your device, a list called Installed Apps (which may be empty) and a log at the bottom. If the log is not visible, open it by clicking the little button with the arrow in the bottom left. Try installing your app on the device by clicking the + sign under Installed Apps and see what comes out in the log. It may make it easier if you clean the log just before you attempt the install, so you don’t have to comb through tonnes of system messages.
Let us know what you find out,
Radoslava
Great one!
Can you please upload the source files (Xcode / AIR), I would really like to check them out.
Maybe that way I can get it to work for my app.
Cheers
Michael
Hi Michael,
What issues do you run into when you try to get this to work for your app?
Cheers,
Radoslava
Superb tutorial, thanks!
Can you please make another one on how to invoke an iOS AIR app from the Share Menu?
Currently I only get the small iOS default share dialog to show up.
Many thanks
Steven
Hi Steven,
Thanks for your feedback!
We’ve just released three more parts to the tutorial:
Part 3: How to launch your AIR app from the iOS 8 Share Menu, 20-25 minutes
Part 4: Sharing files between an AIR app and an iOS Extension, 10-15 minutes
Part 5: How to debug your iOS extension, 5-7 minutes
And a source code companion, which can be downloaded from our store.
I hope these are helpful,
Radoslava
Hi,
I’m trying to make this work, I’ve followed your steps accurately, however I couldn’t make it work so far, it just wont appear as an option in the share menu. I got no errors though, but it just wont show up.
Any ideas of what I could be doing wrong?. Do you happen to have an example code or something like that so I can check?.
Thanks.
Hi,
I followed the tutorial to the letter. But the app is not showing on the “Share” menu or on the … screen. However, if I simply run the “fake” app that we had to create in order to trick XCode, then I do get my app extension to display properly.
Is there any compiler flags, or Plist additions or InfoAdditions that I need to add in order to make this work?
Any help is much appreciated.
p.s. I’m trying in iOS 10.0.2…Compiling with XCode 8.1 beta 2. And as mentioned, if I compile the fake App, I do get the correct result.