

Buy any Easy Native Extensions 2nd Edition package and get our $99 iOS + Android ANE Template completely free before the end of June 2015.
- step-by-step guide to making your iOS extension in under an hour
- library for data conversion between ActionScript and native code
- tutorials
- infographics
- code included
In this tutorial you will learn how to use Gameplay Recorder native extension for iOS to capture awesome videos directly from your game’s screen. Any previous knowledge about Starling framework counts as a plus, but if you don’t have any experience with Starling Lee Brimlow’s introductory video is a great place to start.
At the end of this tutorial you will have
Time
 10-15 minutes
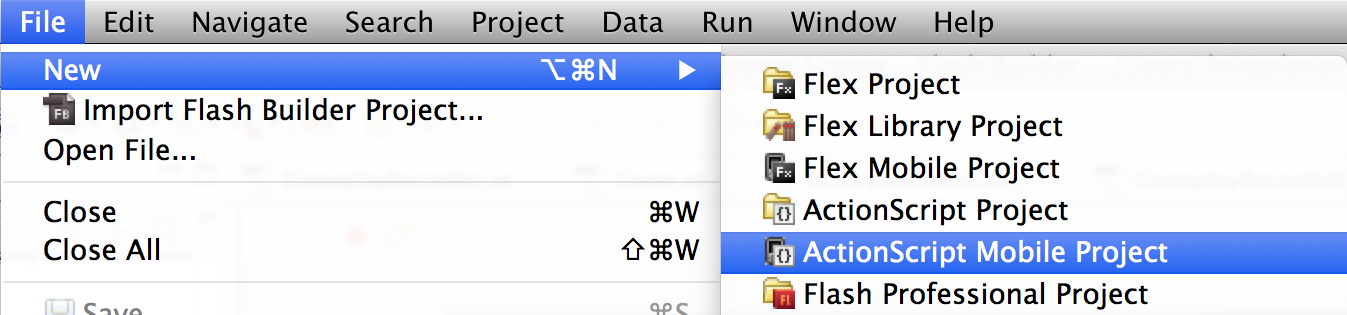
Step 1: Project Setup
First we have to create an ActionScript mobile project and set up the basic structure of our app:
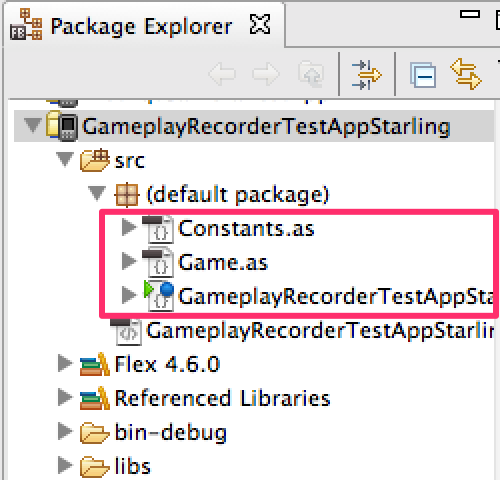
I’ll name my tutorial project GameplayRecorderTestAppStarling:

Include starling.swc in the project’s libraries (you can download it here):

Add the following three files in your project’s src/ folder:
- Constants.as
- Game.as
- GameplayRecorderTestAppStarling.as
We’ll get into the details of each of these files below.
GameplayRecorderTestAppStarling.as
This file is the entry point of our project, here we will initialize Starling and ….
|
1 2 3 4 5 6 7 8 9 10 11 12 13 14 15 16 17 18 19 20 21 22 23 24 25 26 27 28 29 30 31 32 33 34 35 36 37 38 39 40 41 42 43 44 45 46 47 48 49 50 51 52 53 54 55 |
package { import flash.display.DisplayObject; import flash.display.Sprite; import flash.display.Stage; import flash.display.StageAlign; import flash.display.StageScaleMode; import flash.display3D.Context3D; import flash.filesystem.File; import flash.geom.Point; import flash.geom.Rectangle; import flash.system.Capabilities; import flash.utils.flash_proxy; import starling.core.Starling; import starling.utils.RectangleUtil; import starling.utils.ScaleMode; [SWF(frameRate="30", backgroundColor="#000")] public class GameplayRecorderTestAppStarling extends Sprite { private var mStarling:Starling; public function GameplayRecorderTestAppStarling() { var stageWidth:int = Constants.STAGE_WIDTH; var stageHeight:int = Constants.STAGE_HEIGHT; var iOS:Boolean = Capabilities.manufacturer.indexOf("iOS") != -1; Starling.multitouchEnabled = true; Starling.handleLostContext = !iOS; var viewPort:Rectangle = RectangleUtil.fit( new Rectangle(0, 0, stageWidth, stageHeight), new Rectangle(0, 0, stage.fullScreenWidth, stage.fullScreenHeight), ScaleMode.NONE); mStarling = new Starling(Game, stage, viewPort); mStarling.stage.stageWidth = stageWidth; mStarling.stage.stageHeight = stageHeight; mStarling.simulateMultitouch = false; mStarling.enableErrorChecking = Capabilities.isDebugger; mStarling.showStats = true; mStarling.antiAliasing = 1; mStarling.start(); } } } |
Constants.as
In the spirit of good coding practices all global constants will be added here instead of being hardcoded in random places in the project.
|
1 2 3 4 5 6 7 8 9 10 11 12 |
package { import starling.errors.AbstractClassError; public class Constants { public function Constants() { throw new AbstractClassError(); } public static const STAGE_WIDTH:int = 320; public static const STAGE_HEIGHT:int = 480; } } |
For now the only two constants are the width and height of the stage in pixels.
Game.as
This file is the main horsepower of the project. All of the game and recording logic will be placed in here, but for now we will leave it with a basic implementation.
|
1 2 3 4 5 6 7 8 |
package { import starling.display.Sprite; public class Game extends Sprite { } } |
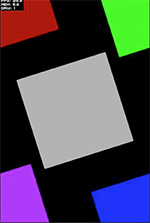
Step 2: Sprinkling rectangles
Our game demo will have five rotating quads, four in every corner of the stage and one in the middle. Let’s start by defining some quads in Game.as:
|
1 2 3 4 5 6 7 8 9 10 11 12 13 14 15 16 17 18 19 20 21 22 23 24 25 26 27 28 29 30 31 32 33 34 35 36 37 38 39 40 41 42 43 44 45 46 47 48 49 50 51 52 53 54 |
private var quads:Vector.<Quad>; private var infoLabel:TextField; public function Game() { addEventListener(Event.ADDED_TO_STAGE, onAdded); } private function onAdded ( e:Event ):void { quads = new Vector.<Quad>(5, true); //creating some quads with different colours //position the first four of them them in the four courners of the stage //and the last in the center of the screen quads[0] = new Quad(200, 200, 0xAA0000); quads[0].x = 0; quads[0].y=0; //set rotation center to be in the center of the quad quads[0].pivotX = 100; quads[0].pivotY = 100; addChild ( quads[0] ); quads[1] = new Quad(200, 200, 0x00FF00); quads[1].x = stage.stageWidth; quads[1].y = 0; //set rotation center to be in the center of the quad quads[1].pivotX = 100; quads[1].pivotY = 100; addChild ( quads[1] ); quads[2] = new Quad(200, 200, 0x0000FF); quads[2].x = stage.stageWidth; quads[2].y = stage.stageHeight; //set rotation center to be in the center of the quad quads[2].pivotX = 100; quads[2].pivotY = 100; addChild ( quads[2] ); quads[3] = new Quad(200, 200, 0xAA00FF); quads[3].x = 0; quads[3].y = stage.stageHeight; //set rotation center to be in the center of the quad quads[3].pivotX = 100; quads[3].pivotY = 100; addChild ( quads[3] ); quads[4] = new Quad(200, 200, 0xAAAAAA); quads[4].x = stage.stageWidth *0.5; quads[4].y = stage.stageHeight*0.5; //set rotation center to be in the center of the quad quads[4].pivotX = 100; quads[4].pivotY = 100; addChild ( quads[4] ); infoLabel = new TextField(100, 100, "Tap Quads to start Recording", "Verdana",12, 0xFFFFFF); infoLabel.x = stage.stageWidth *0.5 - 50; addChild(infoLabel); this.addEventListener( TouchEvent.TOUCH, onTouch); this.addEventListener(EnterFrameEvent.ENTER_FRAME, onEnterFrame); initializeGameplayRecorder(); } |
On every ENTER_FRAME event each quad will rotate a little:
|
1 2 3 4 5 6 7 8 |
private function onEnterFrame(event:EnterFrameEvent):void { for ( var quadID:int = 0; quadID < 5; quadID++ ) { //rotate each quad with 36 degrees per second quads[quadID].rotation += 0.0174532925 * 36 * event.passedTime; } } |
Step 3: Initializing Gameplay Recorder
For this step you’ll need to download DiaDrawGameplayRecorder.ane and add it to your project:

Then initialize the GameplayRecorder…
|
1 2 3 4 5 6 7 8 9 10 11 12 13 14 |
private var m_screenRecorder : GameplayRecorder = null; private var m_savedVideoPath : String = null; private var m_isRecording : Boolean = false; private static const SAVED_VIDEO_SUBFOLDER : String = "diadraw/videos"; private static const SAVED_VIDEO_FILE_NAME : String = "tempVideoFile.mp4"; private function initializeGameplayRecorder() : void { m_screenRecorder = new GameplayRecorder(); m_screenRecorder.addEventListener( GameplayRecorderEvent.VIDEO_SAVED, onVideoSaved ); m_screenRecorder.addEventListener( GameplayRecorderEvent.ERROR, onScreenCastError ); } |
…get ready to start recording by setting up video properties like compression format, resolution, frame rate, etc.
|
1 2 3 4 5 6 7 8 9 10 11 12 13 14 15 16 17 18 19 20 21 22 23 24 25 26 27 28 29 30 31 32 33 34 35 36 37 38 39 40 41 42 43 44 45 46 47 48 49 50 51 52 53 54 55 56 57 58 59 60 61 62 63 64 65 66 67 68 69 70 71 72 73 74 75 76 77 78 79 80 81 82 83 84 85 |
private function startRecording() : void { // 1. Get the path to the file where the video should be saved // Make sure any subfolders already exist: var subDir : File = File.documentsDirectory.resolvePath( SAVED_VIDEO_SUBFOLDER ); if ( !subDir.exists ) { subDir.createDirectory(); } // 2. ... and the optimal video size, based on the container size and the video codec // When using VideoCodecH264 the video width must be one of the standard video widths: 320, 640, etc. // When using VideoCodecJpeg both the width and the height of the video must be one of the standard ones. var videoCodec : Number = VideoSettings.VideoCodecJpeg; //VideoCodecH264; var videoSize : Point = VideoSettings.getStandardVideoSize( stage.stageWidth, stage.stageHeight, videoCodec ); // 3. If the video size isn't the same as the container's, // decide whether we want the container centered in the video frame (or offset in any way) var containerOffsetInFrame : Point = new Point(); // 4. Configure the rest of the video settings var videoSettings : VideoSettings = new VideoSettings(); videoSettings.videoCodec = videoCodec; // Can be VideoSettings.VideoCodecH264 or VideoCodecJpeg. videoSettings.jpegQuality = 0.5; // Takes values between 0.0 and 1.0. Specifies JPEG coded quality. Only has effect for videoSettings.videoCodec set to VideoSettings.VideoCodecJpeg. videoSettings.h264Quality = VideoSettings.H264Main32; // Only has effect for videoSettings.VideoCodec set to VideoSettings.VideoCodec264 // Takes the following values: // VideoSettings.H264Baseline30 // VideoSettings.H264Baseline31 // VideoSettings.H264Baseline41 // VideoSettings.H264Main30 // VideoSettings.H264Main31 // VideoSettings.H264Main32 // VideoSettings.H264Main41 // VideoSettings.H264High40 // Supported on iOS 6 and later, defaults to VideoSettings.H264Baseline30 on earlier iOS versions // VideoSettings.H264High41 // Supported on iOS 6 and later, defaults to VideoSettings.H264Baseline30 on earlier iOS versions videoSettings.framesPerSecond = 15; // Frames per second videoSettings.videoAverageBitRate = 960000; // H264 only, bits per second // This sets the quality preset to be used if the video is mixed with sound after it's been recorded // Use one of the following: VideoSettings.VideoCompositionPresetLowQuality // VideoSettings.VideoCompositionPresetMediumQuality // VideoSettings.VideoCompositionPresetHighestQuality videoSettings.videoCompositionQuality = VideoSettings.VideoCompositionPresetHighestQuality; // Optional audio settings //var inputAudioFile : File = File.applicationDirectory.resolvePath( "assets/exam_piece.m4a" ); //videoSettings.inputAudioFilePath = inputAudioFile.nativePath; videoSettings.inputAudioFilePath = null; // Use this, in order to disable mixing of sound videoSettings.audioOffsetSeconds = 0;//5; videoSettings.loopAudio = false; videoSettings.cutOffAudioAtEndOfVideo = true; // Set saveDebugFrames to true to have every 10th frame saved to CameraRoll - for debugging purposes only var saveDebugFrames : Boolean = false; if ( m_screenRecorder.startRecording( videoSize.x, videoSize.y, videoSettings, draw3dCallback, saveDebugFrames ) ) { m_isRecording = true; infoLabel.text = "Recording in progress..."; trace("Recording in progress..."); } else { infoLabel.text = "ERROR: Could not start recording"; trace("ERROR: Could not start recording"); } } private function finishRecording() : void { var saveVideoToCameraRoll : Boolean = true; m_screenRecorder.finishRecording( saveVideoToCameraRoll ); m_isRecording = false; infoLabel.text = "Saving video file..."; trace("Saving video file..."); } |
We want to know if everything is going well, so here are some handlers that will notify us when the video file is saved successfully or if any errors raise their ugly heads:
|
1 2 3 4 5 6 7 8 9 10 11 |
private function onVideoSaved( _event : GameplayRecorderEvent ) : void { infoLabel.text = "Video saved"; trace( "Video saved"); } private function onScreenCastError( _event : GameplayRecorderEvent ) : void { // deal with errors from the native extension trace( "ScreenCastNativeExtension error: " + _event.message ); } |
Step 4: Record video
We are almost ready. The only thing left to do is to add the start/stop recording mechanism and to take a bitmap from the screen.
First let’s enable recording by touching any of the quads. If you want to finish recording just tap the quads once again.
|
1 2 3 4 5 6 7 8 9 10 11 12 13 14 15 16 17 18 19 |
private function onTouch(event:TouchEvent):void { var touch:Touch = event.getTouch(this, TouchPhase.BEGAN); if(touch) { //start recording if we didn't do it already if(!m_isRecording) { startRecording(); } else { finishRecording(); } trace("StarlingEvent: onTouch"); } } |
The last peace of code is the most important one in this tutorial.
To record a video you have to grab a bitmap from the screen every time a frame is requested. It’s done by a callback function with a predefined signature. A pointer to this function is given to the m_screenRecorder.startRecording() as the fourth argument.
Here is a diagram of how this function is used:

- Inside DiaDrawGamepayRecorderANE an event is triggered in accordance with the video’s frame rate (FPS) you have set.
- This event causes your screen grab callback to be called with a BitmapData as an argument.
- The data you put into this BitmapData is then encoded as a video frame in your screen cast video.
Here is the code for this magic function:
|
1 2 3 4 5 |
private function draw3dCallback( _bmp:BitmapData ):void { //ask Starling to draw the stage into the bitmap stage.drawToBitmapData(_bmp); } |
Voilà here are our quads ready to rock and roll:
Credit
Special thanks to the guys at Bacon Bandit Games for their handy post on saving screenshots from Starling and also thanks to Amos Laber about explaining the nitty gritty details in his post.
FAQ
1. Where can I download the Gameplay Recorder ANE?
2. Is the source code available for the Gameplay Recorder ANE?
wonderful ANE. I am begining study to create ANE.