
At the end of this part you will have:
An AIR library, ready to be packaged in an AIR Native Extension for Windows.
Time
10-15 minutes
Wait, have you done this first?
- Part 1: The native DLL project, 8-10 minutes
- Part 2: The Native DLL code, 10-15 minutes
The first two parts of this tutorial walk you through building the native Windows library that your ANE will use. If you haven’t done that yet, you can do it after this part, but make sure you have a DLL built before you move on to packaging the ANE.
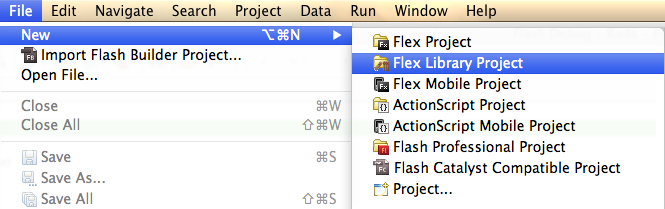
Step 1: Create a Flex Library Project
In Flash Builder select File > New > Flex Library Project:
In the dialog that appears, tick Include Adobe AIR libraries. Name your project and save it. I have named mine DiaDrawWindowsANETutorialAIRLib:
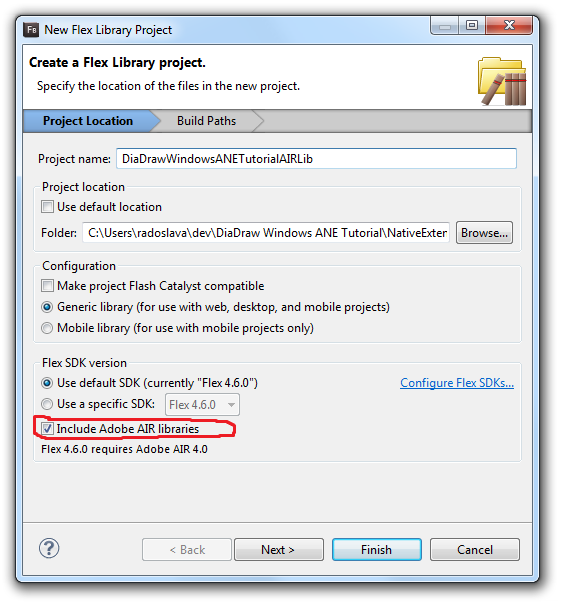
Leave the next step of the New Flex Library dialog set as default and click Finish to create your AIR library project.
Step 2: Create the AIR wrapper for your ANE
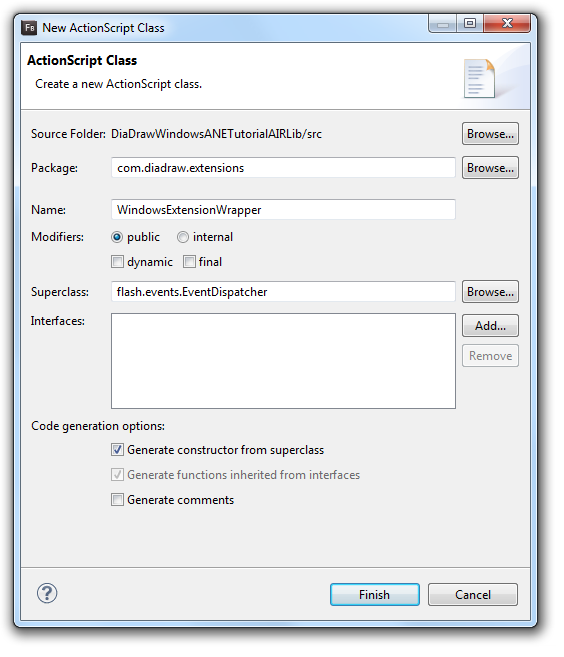
In this step you’ll add an ActionScript class to your AIR library, whose purpose will be to talk to Windows.
Add a new ActionScript class to the src/ folder of your project, name it WindowsExtensionWrapper, set its superclass to flash.events.EventDispatcher and put it in a package of your choice: mine is com.diadraw.extensions.
Why subclass EventDispatcher?
A lot of the work that happens in an Adobe AIR Native Extension is asynchronous. Getting asynchronous events from your Windows DLL is also one of the few ways that the code in the DLL can communicate with your AIR library. Making your extension wrapper inherit EventDispatcher allows you to pass these events back to an app that uses your ANE.
I won’t cover passing messages on Windows in this tutorial. Unless you scream loud and clear in the comments below, of course.
Flash Builder will automatically create this for you:
|
1 2 3 4 5 6 7 8 9 10 11 12 13 |
package com.diadraw.extensions { import flash.events.EventDispatcher; import flash.events.IEventDispatcher; public class WindowsExtensionWrapper extends EventDispatcher { public function WindowsExtensionWrapper(target:IEventDispatcher=null) { super(target); } } } |
Step 3: Add the Extension Context
Let’s start adding functionality to your newly created class by having it create an extension context in its constructor. You will need the context instance to make calls to native code later on, so make it a private class member:
|
1 |
private var m_extContext : ExtensionContext = null; |
To instantiate an ExtensionContext you’ll need a unique string – an Extension ID. You will also need to listen to events that may come from your native code.
Below is the modified code for the WindowsExtensionWrapper class:
|
1 2 3 4 5 6 7 8 9 10 11 12 13 14 15 16 17 18 19 20 21 22 23 24 25 26 27 28 29 30 31 32 33 34 |
package com.diadraw.extensions { import flash.events.EventDispatcher; import flash.events.IEventDispatcher; import flash.events.StatusEvent; import flash.external.ExtensionContext; public class WindowsExtensionWrapper extends EventDispatcher { public function WindowsExtensionWrapper( _target : IEventDispatcher = null ) { super( _target ); // Create a new extension context and listen for status events from it: m_extContext = ExtensionContext.createExtensionContext( EXTENSION_ID, null ); m_extContext.addEventListener( StatusEvent.STATUS, onStatusEvent ); } private function onStatusEvent( _event : StatusEvent ) : void { // Here you can add functionality to deal with the various events // that you may need to dispatch from native code. // For the moment let's just log what comes in for now: trace( "Event code: " + _event.code + ", event level: " + _event.level ); } // For this tutorial we'll need one ExtensionContext instance // and we'll need to keep it while our ANE is in use: private var m_extContext : ExtensionContext = null; // The extension ID needs to be a unique string: private static const EXTENSION_ID : String = "com.diadraw.extensions.tutorial.WindowsExtension"; } } |
Step 4: Add the AIR API of your extension
As pompous as this sounds, that’s actually the meat of your AIR library: the functions that will serve as the interface between an app and the native code you wrote in the previous step of this tutorial.
Well, one function in this case. Add the following public method to your WindowsExtensionWrapper class:
|
1 2 3 4 5 6 7 |
public function passString ( _message : String ) : String { // Calls the ASPassAString function (exposed as "as_passAString" to ActionScript) // that we defined in dllMain.cpp: // passes a string to it and expects a strnig back. return m_extContext.call( "as_passAString", _message ) as String; } |
Step 5: Add the extension descriptor
Add a new XML file to your AIR library’s src folder and name it DiaDrawWindowsANETutorialAIRLib-extension.xml (you can give it any name, really).
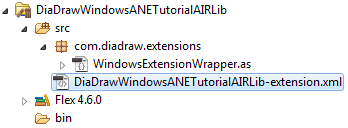
Your project should now look like this:
And this is what your extension file should contain:
|
1 2 3 4 5 6 7 8 9 10 11 12 13 14 15 16 17 18 19 20 21 22 23 24 25 26 |
<?xml version="1.0" encoding="UTF-8"?> <extension xmlns="http://ns.adobe.com/air/extension/3.1"> <!-- This is the extension ID: the same unique string you defined in WindowsExtensionWrapper.as --> <id>com.diadraw.extensions.tutorial.WindowsExtension</id> <versionNumber>1.0.0</versionNumber> <platforms> <platform name="Windows-x86"> <applicationDeployment> <!-- The name of the DLL file: --> <nativeLibrary>DiaDrawWindowsANETutorialDLL.dll</nativeLibrary> <!-- The names of the extension initializer and finalizer functions you defined in dllMain.cpp: --> <initializer>ExtensionInitializer</initializer> <finalizer>ExtensionFinalizer</finalizer> </applicationDeployment> </platform> </platforms> </extension> |
Build your project to make sure you don’t get any compiler errors and you are now ready to package your ANE.
What’s next?
- Part 4: Packaging the ANE – 10-12 minutes
- See the table of contents for the tutorial, in case you want to jump back or ahead.

Buy any Easy Native Extensions 2nd Edition package and get our $99 iOS + Android ANE Template completely free before the end of June 2015.
- step-by-step guide to making your iOS extension in under an hour
- library for data conversion between ActionScript and native code
- tutorials
- infographics
- code included

Leave a Reply