By this part you have already packaged a Native Extension for Windows or have one at hand from elsewhere. In this article we will see how to include it in an app and use it.
At the end of this part you will have:
An Adobe AIR Native Extension (ANE) ready to be used on Windows.
Time
12-15 minutes
Wait, have you done this first?
- Part 1: The native DLL project, 8-10 minutes
- Part 2: The Native DLL code, 10-15 minutes
- Part 3: Set up the AIR Library – 8-10 minutes
- Part 4: Packaging the ANE – 10-12 minutes
Alternatively, if you don’t need to learn how to make an ANE yourself, but want to know how to use one on Windows, skip the prerequisite parts and read on.
Step 1: Create a Windows Desktop project
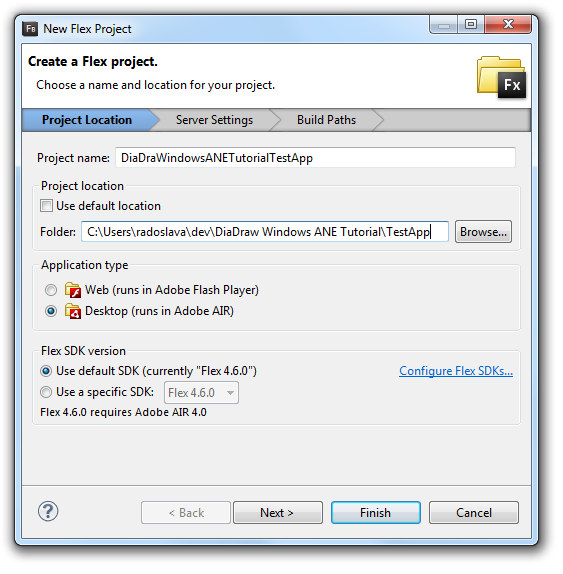
In Flash Builder slect File > New > Flex Project:
Give the project a name and make it a Desktop project:
Click Finish to create your project.
Step 2: Add the ANE
Two of Adobe’s tools will need to be able to see your ANE: the compiler and the packager.
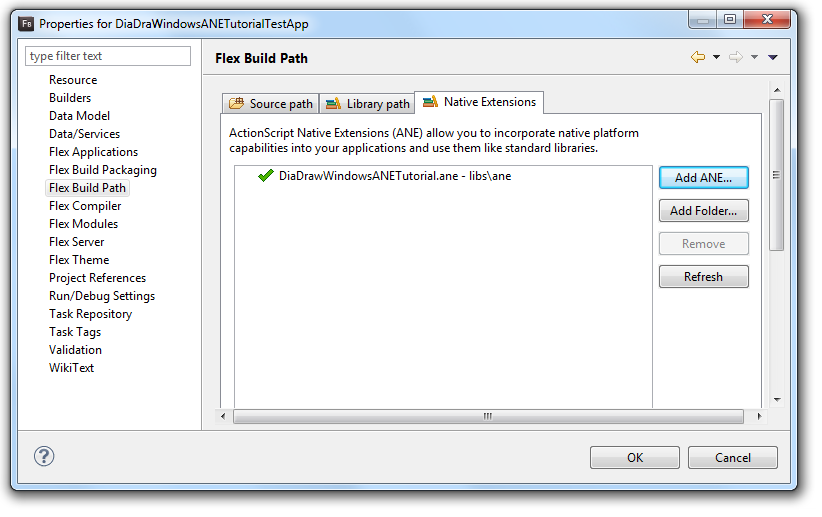
First, let the compiler know where the ANE is by opening your project’s Properties > Flex Build Path > Native Extensions. Click Add ANE… and navigate to your ANE. I tend to copy if in the app’s libs/ane folder, or rather, my build scripts do that for me.
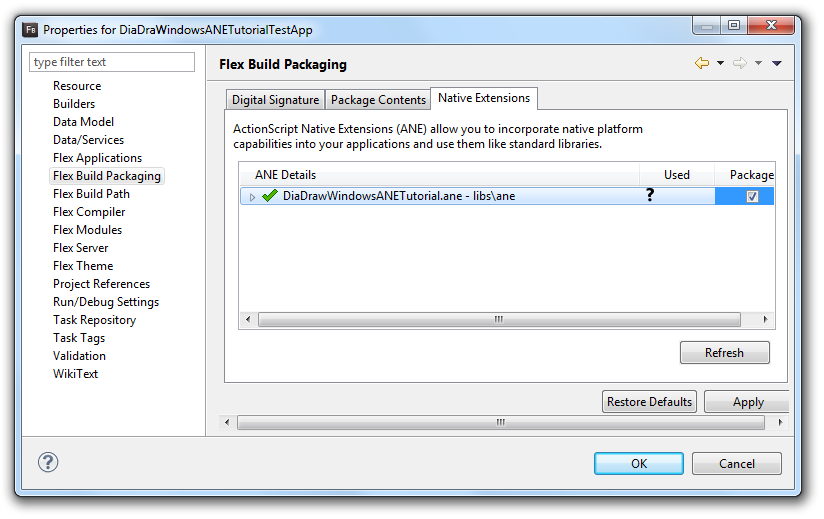
 Next, make sure the packaging tool knows to link the ANE in the app. Still in the Properties dialog, open Flex Build Packaging > Native Extensions. You should see the ANE listed there. Make sure you tick the box under Package, so that the ANE gets included in the app.
Step 3: Add testing code
Here we will do the minimum we can get away with: add a text box and a button to your app’s main file (.mxml). When the button is pressed, it will call the method you defined in the native extension.
|
1 2 3 4 5 6 7 8 9 10 11 12 13 14 15 16 17 18 19 20 21 22 23 24 25 26 27 28 29 30 31 32 33 34 35 36 |
<?xml version="1.0" encoding="utf-8"?> <s:WindowedApplication xmlns:fx="http://ns.adobe.com/mxml/2009" xmlns:s="library://ns.adobe.com/flex/spark" xmlns:mx="library://ns.adobe.com/flex/mx" creationComplete="windowedapplication1_creationCompleteHandler(event)"> <fx:Script> <![CDATA[ import com.diadraw.extensions.WindowsExtensionWrapper; // the extension class import mx.events.FlexEvent; protected function windowedapplication1_creationCompleteHandler(event:FlexEvent):void { // Instantiate the extension class: m_ext = new WindowsExtensionWrapper(); } protected function btnTest_clickHandler(event:MouseEvent):void { var inputString : String = "Thank you, Eric, for the inspiration for this tutorial!"; log.text += "inputString: " + inputString + "\n"; // Then call the passString method on it and check what it returns: var outputString : String = m_ext.passString( inputString ); log.text += "ouputString: " + outputString + "\n"; } private var m_ext : WindowsExtensionWrapper = null; ]]> </fx:Script> <s:VGroup left="10" right="10" top="10" bottom="10"> <s:TextArea id="log" width="100%" height="100%"/> <s:Button id="btnTest" width="100%" label="Test ANE" click="btnTest_clickHandler(event)"/> </s:VGroup> </s:WindowedApplication> |
Step 4: Run the app
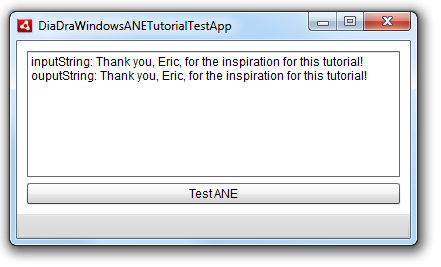
Run the app in the Flash Builder debugger. When you click the Test ANE button, you should see the ANE in action: passing a string to the native DLL and receiving it back:
What’s next?
- Part 6: Debugging the ANE – 15-20 minutes
- See the table of contents for the tutorial, in case you want to jump back or ahead.

Buy any Easy Native Extensions 2nd Edition package and get our $99 iOS + Android ANE Template completely free before the end of June 2015.
- step-by-step guide to making your iOS extension in under an hour
- library for data conversion between ActionScript and native code
- tutorials
- infographics
- code included


Leave a Reply